Do you want to install WordPress in a subdirectory? Installing WordPress in a subdirectory allows you to run multiple instances of WordPress under the same domain or even subdomain name. In this article, we will show you how to install WordPress in a subdirectory without affecting the main domain name.
Normally, you'd want to start a WordPress website with your own domain name (for example, wpbeginner.com). However, sometimes you may want to create additional websites on the same domain name.
This can be done by installing WordPress on a subdomain (http://newebsite.example.com) or as a subdirectory (http://example.com/newwebsite/).
One question we get asked is which one is better for SEO?
Search engines treat subdomains differently from root domain names and rank them as a totally different website.
On the other hand, subdirectories benefit from the domain authority of the root domain, so they rank higher in most cases.
An easier way to create separate WordPress sites on both subdomain and subdirectory is by installing the WordPress Multisite Network.
However, if you want to maintain two separately managed websites, you can install different WordPress instances.
With that said, let's take a look at how to install WordPress to a subdirectory.
You must first create a subdirectory or folder under your root domain name. This is where you will install the WordPress files.
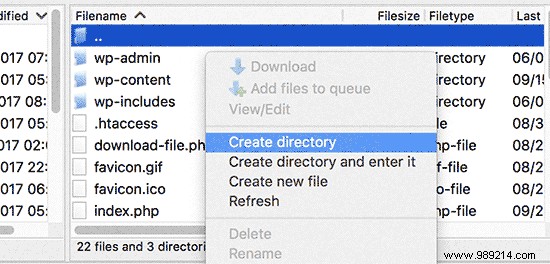
Connect to your WordPress hosting account using an FTP client or File Manager in cPanel.
Once connected, go to the root folder of your website. Usually it is the /public_html/ folder. If you already have WordPress installed in the root folder, you will see your WordPress files and folders there.
Next, you need to right-click and select 'Create New Directory' from the menu.
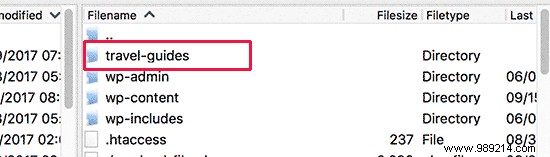
You must be careful when choosing the name for your subdirectory. This will become part of the URL of your new WordPress site and what your users will type into their browsers to get to this website.
For example, if you name the travel guides in this directory, your WordPress website address will be:
http://example.com/travel-guides/
Your newly created subdirectory is empty at the moment. We are going to change that when uploading WordPress files.
You must first visit the WordPress.org website and click the download button.

Your browser will now download the zip file containing the latest WordPress software to your computer.
After downloading the file, you need to select and extract it. Mac users can double-click the file to extract it, and Windows users must right-click and then select "Extract All."
After extracting the zip file, you will see the 'wordpress' folder that contains all the WordPress files.
Now let's upload these files to your new subdirectory.
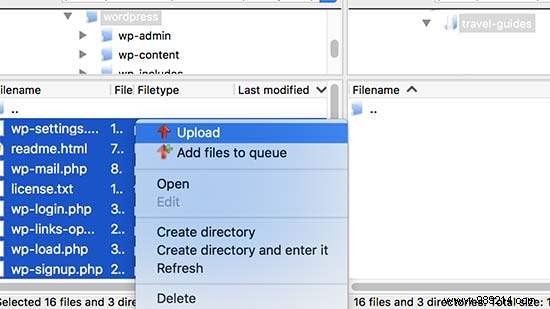
Connect to your website using an FTP client and go to the subdirectory you created in the first step.
In the local files pane of your FTP client, go to the WordPress folder you just extracted.
Select all the files in the WordPress folder and then upload them to your new subdirectory.
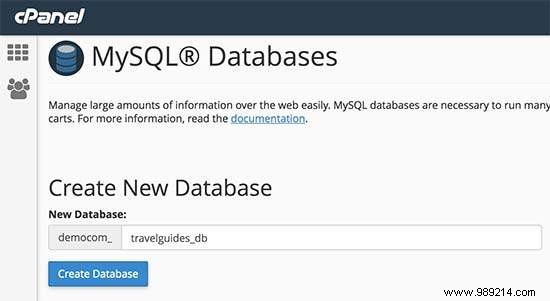
WordPress stores all of its content in a database. You must create a new database to use with your new WordPress site installed in a subdirectory.
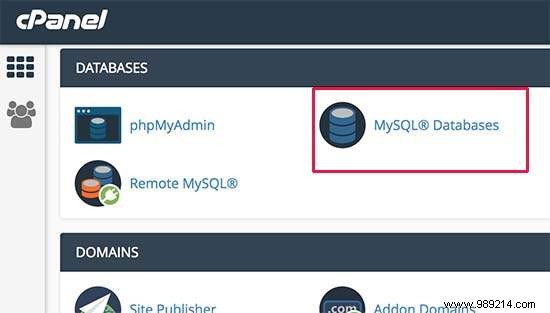
First, you need to log in to the cPanel control panel of your WordPress hosting account. Click on 'MySQL Databases' in the databases section.
On the next screen, you need to provide a name for your new database and then click the 'Create Database' button to continue.
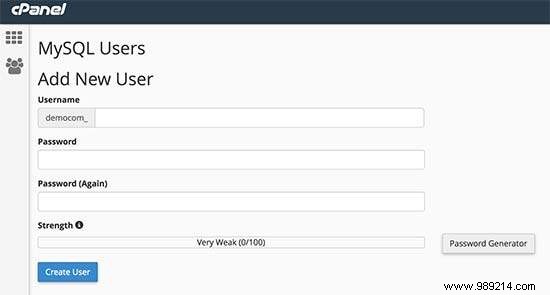
Your cPanel control panel will now create the new MySQL database. In order to use this database you need to create a MySQL username.
Scroll down to the MySQL Users section and provide a new username and password. Click the 'Create User' button to continue.
Next, you need to grant this newly created user privileges to work on the database you created earlier.
Scroll down to the 'Add User to Database' section. Select your MySQL username and then select your newly created database.
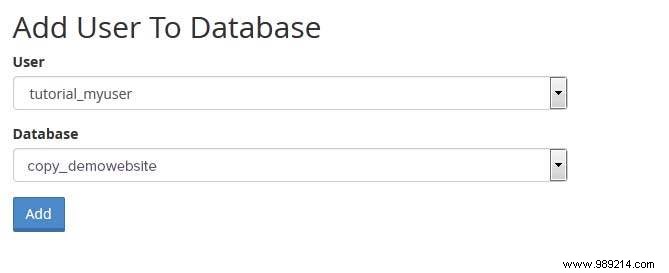
Click the Add button to continue.
Cpanel will now grant the MySQL user full privileges on your newly created database.
Now that everything is in place, you can go ahead and install WordPress. Simply visit the directory you created earlier in a web browser by typing the URL like this:
http://example.com/your-subdirectory-name/
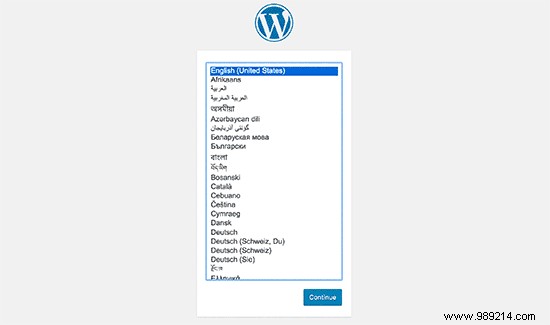
This will open the WordPress installation wizard. You must first select the language for your WordPress website and click the Continue button.
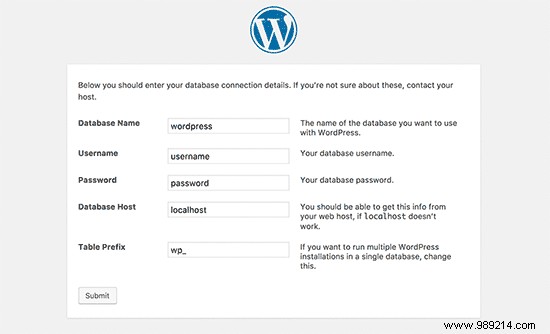
You will then be asked to provide your WordPress database name, database username, password, and host. Enter the database details and click the submit button.
WordPress will now connect to your database and you will see a success message like this:
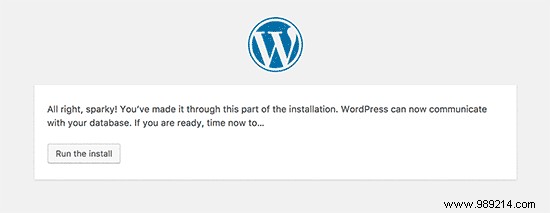
Click the 'Run Setup' button to continue.
On the next screen, you will be prompted to provide a title for your website and choose an administrator username, password, and email address.
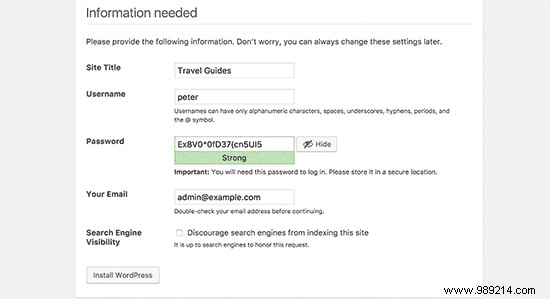
After entering your website details, click the 'Run Setup' button to continue.
WordPress will now configure your website and show you a success message:
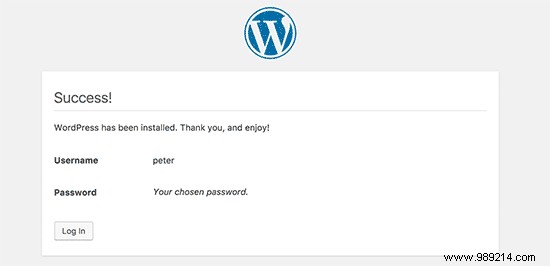
You can now go ahead and login to your new WordPress website installed in the subdirectory.
If you have a separate WordPress installation in the root directory, the .htaccess files in its subdirectory will conflict. This will result in 404 errors on your website.
To resolve this, you need to edit the .htaccess file in your WordPress installation subdirectory. Replace the code inside your .htaccess file with the following code:
# COMIENZO WordPress RewriteEngine On RewriteBase / your-subdirectory / RewriteRule ^ index \ .php $ - [L] RewriteCond% REQUEST_FILENAME! -F RewriteCond% REQUEST_FILENAME! -D RewriteRule. /your-subdirectory/index.php [L] # END WordPress
Don't forget to replace /your subdirectory/ with your own subdirectory name.
We hope this article helped you install WordPress in a subdirectory. You may also want to see our step-by-step guide to WordPress SEO for beginners.
If you enjoyed this article, please subscribe to our WordPress YouTube Channel video tutorials. You can also find us on Twitter and Facebook.