If you are a WordPress developer, at some point you can customize or extend the WordPress Visual Editor. For example, you might want to add a button to the VisualEditor toolbar to allow your customer to easily insert a text box or call-to-action button without writing any HTML code. In this article, we will show you how to create a TinyMCE plugin in WordPress.
This tutorial is intended for advanced users. If you are a beginner level user who just wants to extend the visual editor, please check out the TinyMCE Advanced plugin or see these tips on using the WordPress visual editor.
For this tutorial, you'll need basic coding skills, access to a WordPress installation where you can test it out.
It is bad practice to develop plugins on a live website. A minor error in the code can make your site inaccessible. But if you must do it on a live site, at least backup WordPress first.
We will start by creating a WordPress plugin to register our custom TinyMCE toolbar button. When clicked, this button will allow the user to add a link with a custom CSS class.
The source code will be provided in full at the end of this article, but until then, let's create the plugin step by step.
First, you need to create a directory in wp-content / plugins folder of your WordPress installation. Name this folder tinymce-custom-link-class .
From here, we'll start adding our plugin code.
Create a new file in the plugins directory we just created and name this file tinymce-custom-link-class.php . Add this code to the file and save it.
/ ** * Nombre del complemento: TinyMCE Custom Link Class * URI del complemento: http://wpbeginner.com * Versión: 1.0 * Autor: WPBeginner * URI del autor: https://www.wpbeginner.com * Descripción: Un sencillo complemento de TinyMCE para agregar una clase de enlace personalizada en el Editor Visual * Licencia: GPL2 * /
This is just a PHP comment, which tells WordPress the name of the plugin, as well as the author and a description.
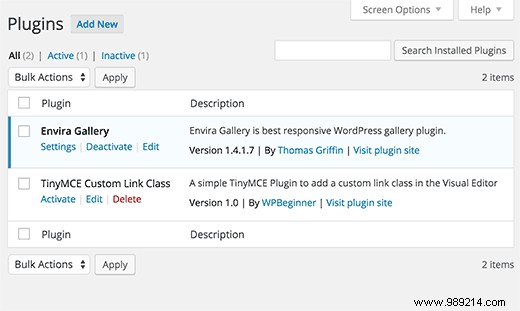
In the WordPress admin area, activate your new plugin by going to Plugins> Installed Plugins, and then click Activate next to the TinyMCE Custom Link Class Plugin:
If two WordPress plugins have functions with the same name, this would cause an error. We will avoid this problem by having our functions wrapped in a class.
clase TinyMCE_Custom_Link_Class / ** * Constructor. Se llama cuando se inicializa el plugin. * / function __construct () $ tinymce_custom_link_class = new TinyMCE_Custom_Link_Class;
This creates our PHP class, along with a construct, which is called when we reach line $ tinymce_custom_link_class = new TinyMCE_Custom_Link_Class; .
Any functionality we add inside this class should not conflict with other WordPress plugins.
Next, we need to tell TinyMCE that we might want to add our custom button to the Visual Editor toolbar. To do this, we can use WordPress actions - specifically, the en eso action.
Add the following code inside your plugin __construir() function:
if (is_admin ()) add_action ('init', array ($ this, 'setup_tinymce_plugin'));
This checks if we are in the WordPress admin interface. If we are, then it asks WordPress to execute the setup_tinymce_plugin works inside our class when WordPress has finished its initial load routine.
Then add the setup_tinymce_plugin function:
/ ** * Verifique si el usuario actual puede editar Publicaciones o Páginas, y está usando el Editor Visual * Si es así, agregue algunos filtros para que podamos registrar nuestro complemento * / function setup_tinymce_plugin () // Verifique si el usuario de WordPress conectado puede editar publicaciones o páginas // Si no, no registre nuestro complemento TinyMCE si (! current_user_can ('edit_posts') &&! current_user_can ('edit_pages')) return; // Compruebe si el usuario de WordPress que está conectado tiene el Editor visual habilitado // Si no, no registre nuestro complemento TinyMCE si (get_user_option ('rich_editing')! == 'true') return; // Configurar algunos filtros add_filter ('mce_external_plugins', array (& $ this, 'add_tinymce_plugin')); add_filter ('mce_buttons', array (& $ this, 'add_tinymce_toolbar_button')); This checks if the currently logged in WordPress user can edit posts or pages. If they can't, there's no point in registering our TinyMCE plugin for that user, as they'll never see the visual editor.
We then check if the user is using the Visual Editor, as some WordPress users disable it via Users> Your Profile. Again, if the user is not using the VisualEditor, we return (exit) the function, since we don't need to do anything else.
Finally, we added two WordPress filters. - mce_external_plugins and mce_buttons , to call our functions that will load the required Javascript file for TinyMCE, and add a button to the TinyMCE toolbar.
Let's go ahead and add the add_tinymce_plugin function:
/ ** * Agrega un archivo JS compatible con el complemento TinyMCE a la instancia de TinyMCE / Visual Editor * * @param array $ plugin_array Matriz de los complementos TinyMCE registrados * @return array Conjunto modificado de los complementos registrados de TinyMCE * / función add_tinymce_plugin ($ plugin_array) $ plugin_array ['custom_link_class'] = plugin_dir_url (__FILE__). 'tinymce-custom-link-class.js'; devuelve $ plugin_array;
This function tells TinyMCE that it needs to load the Javascript files stored in the $ plugin_array training. These Javascript files will tell TinyMCE what to do.
We also need to add some code to the add_tinymce_toolbar_button function, to tell TinyMCE about the button we'd like to add to the toolbar:
/ ** * Agrega un botón a TinyMCE / Visual Editor en el que el usuario puede hacer clic * para insertar un enlace con una clase CSS personalizada. * * @param array $ buttons Arreglo de botones TinyMCE registrados * @return array Arreglo modificado de botones TinyMCE registrados * / function add_tinymce_toolbar_button ($ buttons) array_push ($ buttons, '|', 'custom_link_class'); devuelve $ botones;
This pushes two elements into the TinyMCE button array:a separator (|), and the programmatic name of our button (custom_link_class ).
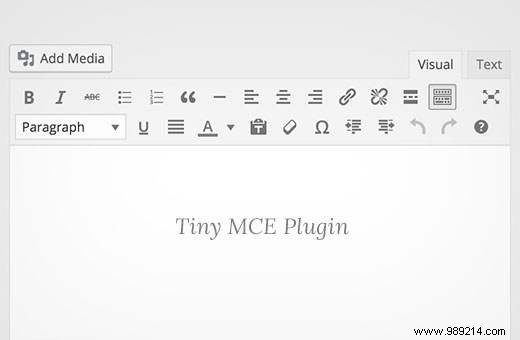
Save your plugin and then edit a page or post to see the Visual Editor. The toolbar may not be showing at this time:

Don't worry:if we use our web browser's inspector console, we'll see that TinyMCE has generated a 404 error and a warning that it can't find our Javascript file.
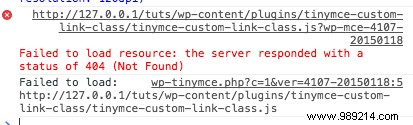
That's good:it means we've successfully registered our custom TinyMCE plugin, and now we need to create the Javascript file to tell TinyMCE what to do.
Create a new file in your wp-content / plugins / tinymce-custom-link-class folder, and name tinymce-custom-link-class.js . Add this code in your js file:
(function () tinymce.PluginManager.add ('custom_link_class', function (editor, url) );) ();
This calls the TinyMCE Plugin Manager class, which we can use to perform a number of actions related to the TinyMCE plugin. Specifically, we are adding our plugin to TinyMCE using the añadir function.
This accepts two items; the plugin name (custom_link_class ) and an anonymous function.
If you're familiar with the concept of functions in coding, an anonymous function is simply a function with no name. For example, función foobar () … It is a function that we could call elsewhere in our code by using foobar () .
With an anonymous function, we can't call that function elsewhere in our code, it's only called at the point where añadir() the function is called.
Save your Javascript file and then edit a page or post to see the Visual Editor. If everything worked, you will see the toolbar:

At this time, our button has not been added to that toolbar. This is because we have only told TinyMCE that we are a custom plugin. Now we need to tell TinyMCE what to do, ie add a button to the toolbar.
Update your Javascript file, replacing your existing code with the following:
(function () tinymce.PluginManager.add ('custom_link_class', function (editor, url) // Agregar botón a la barra de herramientas del editor visual editor.addButton ('custom_link_class', title: 'Insert Button Link', cmd: ' custom_link_class ',););) ();
Notice that our anonymous function has two arguments. The first is editor instance - this is the TinyMCE Visual Editor. In the same way we can call various functions in the Plugin Manager , We can also call various functions in the editor . In this case, we are calling the addButton Function, to add a button to the toolbar.
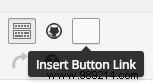
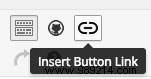
Save your Javascript file and go back to your VisualEditor. At first glance, nothing seems to have changed. However, if you move your mouse cursor to the right of the top row's rightmost icon, you should see a tooltip appear:
We have successfully added a button to the toolbar, but it needs an image. Add the following parameter to the addButton function, below the título: line:
imagen: url + '/icon.png',
url is the URL of our plugin. This is useful if we want to reference an image file within our plugins folder, as we can append the image file name to the URL. In this case, we will need an image called . icon.png in our plugin folder. Use the following icon:

Reload our VisualEditor, and you will now see your button with the icon:
Right now, if you click the button, nothing will happen. Let's add a command to TinyMCE that tells it what to do when our button is clicked.
In our Javascript file, add the following code below the end of the editor.addButton section:
// Agregar comando al hacer clic en el botón editor.addCommand ('custom_link_class', function () alert ('Button clicked!');); Reload our VisualEditor, click the button and an alert will appear confirming that we just clicked the button:

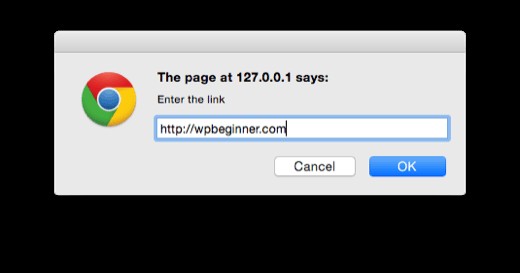
Reemplazemos la alerta con un mensaje, solicitando al usuario el enlace que desea envolver alrededor del texto seleccionado en el Editor Visual:
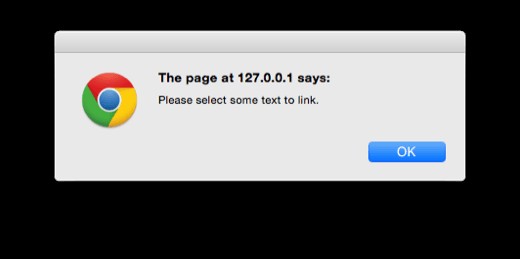
// Agregar comando cuando se pulsó el botón editor.addCommand ('custom_link_class', function () // Verifique que hayamos seleccionado el texto que queremos vincular var text = editor.selection.getContent ('format': 'html' ); if (text.length === 0) alert ('Seleccione un texto para vincular.'); volver; // Pídale al usuario que ingrese una URL var result = prompt ('Ingrese el enlace'); if (! result) // User cancelled: exit return; if (result.length === 0) // User no ingresó una URL: exit exit; // Insertar el texto seleccionado de nuevo en el editor, ajuste en un editor de etiquetas de anclaje.execCommand ('mceReplaceContent', false, '' + text + '');); Este bloque de código realiza algunas acciones..
Primero, verificamos si el usuario seleccionó algún texto para vincularlo en el Editor Visual. Si no, verán una alerta que les dice que seleccionen un texto para vincular.
A continuación, les pedimos que ingresen un enlace, nuevamente verificando si lo hicieron. Si cancelaron, o no ingresaron nada, no hacemos nada más..
Finalmente, corremos el execCommand función en el editor TinyMCE, ejecutando específicamente el mceReplaceContent action. Esto reemplaza el texto seleccionado con nuestro código HTML, que consta de un enlace de ancla con el botón class ="", usando el texto que el usuario seleccionó.
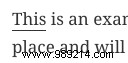
Si todo funcionó, verás que el texto seleccionado ahora está vinculado en el Editor Visual y en las vistas de Texto, con la clase establecida en botón :

Hemos creado con éxito un complemento de WordPress que agrega un botón al editor visual de TinyMCE en WordPress. Este tutorial también ha cubierto algunos de los conceptos básicos de la API de TinyMCE y los filtros de WordPress disponibles para las integraciones de TinyMCE.
Agregamos código para que cuando un usuario haga clic en nuestro botón personalizado, se le solicite que seleccione un texto en el Editor Visual, que luego puede vincular a una URL de su elección. Finalmente, nuestro complemento luego reemplaza el texto seleccionado con una versión vinculada que contiene una clase CSS personalizada llamada botón .
Esperamos que este tutorial le haya ayudado a aprender cómo crear un complemento de WordPress TinyMCE. También puede consultar nuestra guía sobre cómo crear un complemento de WordPress específico para el sitio..
If you enjoyed this article, please subscribe to our WordPress YouTube Channel video tutorials. You can also find us on Twitter and Facebook.