We are often asked by our users about how to create a daily and weekly newsletter in WordPress. We use this option on our email signup form, which allows users to choose daily or weekly newsletters. In this article, we will show you how to create a daily and weekly newsletter in WordPress.
All marketing experts agree that email marketing is crucial for any blog or website. It is profitable and highly attractive. Check out our guide on why you should start building your email list right away.
However, not all users want to receive daily email updates. Some of them may prefer to receive an email once a week.
Instead of losing subscribers when they receive unexpected emails, it's better to offer them a weekly digest option. This allows users to control how often they want to hear your comments and increases the likelihood of subscribing.
This is what we are going to build:
Note: For this tutorial you must sign up with an email marketing service. We are using MailChimp for this tutorial, however the basic concept is the same for all email services.
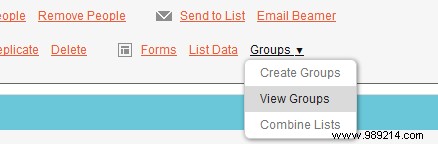
Sign in to your account and click on the Lists navigation element. You will see a list of your lists. Click the Groups »View Groups option.
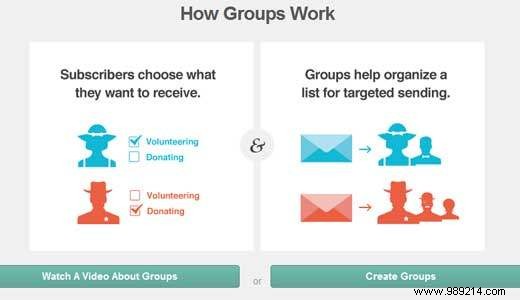
Since you don't have any groups yet, you'll see a screen like this. You can click to watch the video for more information. To follow this tutorial, you must click the Create Groups button.
Once you click on that button, you will see a screen like this.
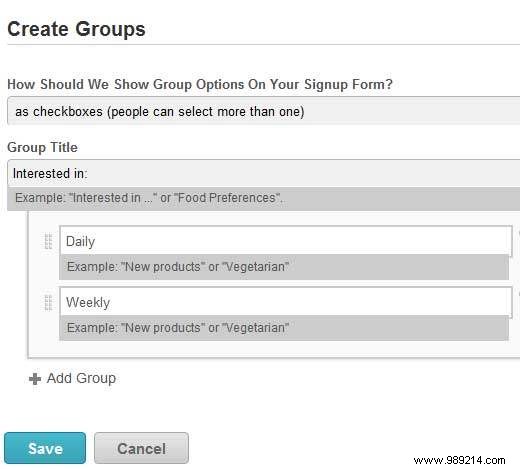
You have the option to display group options on the registration form. You can choose the options to be checkboxes like our site, radio buttons, dropdowns, or not show them at all. In our case, checkboxes are the ideal option. Choose the title of the group, then add the options you want. Since we only do daily and weekly newsletters, we will only add these two. Feel free to do it like we did on our site, WPB Daily. Save the groups and you're done with this part.
Now we go to the forms part of our list. Go back to the Lists page. Click the Forms link.
You will see a page showing what your registration form looks like. There is a constructor that you can use to customize the header images and such. We have customized our form, so that it looks like this.
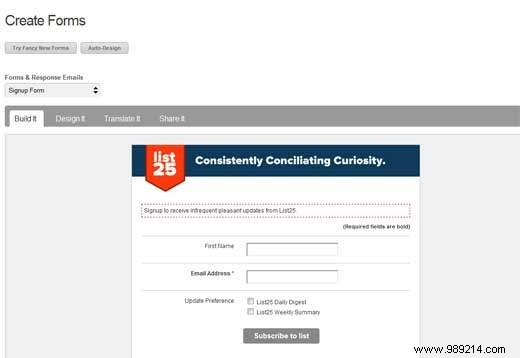
The only reason we're checking this is to see that the checkboxes are there. Once done, scroll to the top of the page and click "For Your Website Tab" and get the Signup Form Embed Code.
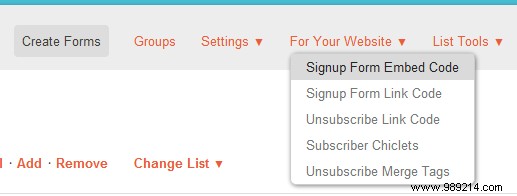
You will see the option to create a form embed code. There are several options there, but we'll select the Naked Shape option. This allows us to easily customize things the way we want.
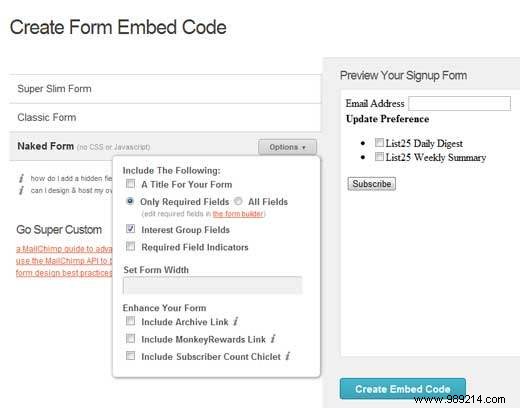
You most likely don't want the required headers and field prompts to be on your form. So click on the options box and match the settings like our screenshot above. Then click Create Embed Code. The embed code will be displayed on the same page just below the button.
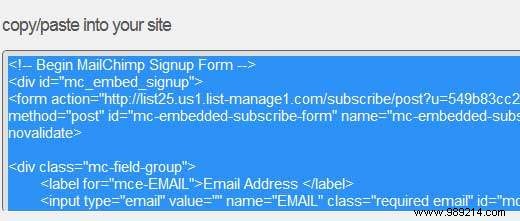
Copy and paste that code into your theme. The location can be wherever you want the signup form to be displayed. In our case, it's in the sidebar, so we'll paste the code into the sidebar.php file. Once you paste the code, our goal is to break down all the style divs. Let's keep just the basic form fields. Your result should look something like this:
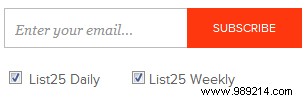
List25 Daily List25 Weekly
Notice that we've moved the submit button right after the email field. We've also gotten rid of the email field label, so it just displays as a blank field with no default value text. We also removed the error fields mainly because a new success tab explanation works much better. Since our users have no idea what to put in our blank input field that is meant for email, we need to let them know. The best way to do this is by using the onblur and onfocus values.
Let's go ahead and replace the email input field to be something like this:
What the code will do is it will add the text called "Enter your email..." in the email input field. However, when the user clicks the field to enter their email, it will automatically disappear.
Now that we've taken care of that, let's add some additional classes to our form:
List25 Daily List25 Weekly
Please note that we have added additional divs. We've also added an additional class to the second checkbox input field, and to the submit button. Now that we've defined our html elements, let's go ahead and add the styling to the css file (style.css).
.suscribirse ancho: 296px; altura: 38px; borde: sólido #bbbbbb 1px; margen: 0 0 60px 0; .subscribecheckboxes margen: 20px 0 0 0; familia de fuentes: 'ProximaNovaRegular', sans-serif; tamaño de fuente: 14px; color: # 626262; .secondcheckbox margen: 0 0 0 28px; .emailupdatesinput width: 162px; altura: 38px; frontera: ninguna; Familia tipográfica: Georgia, serif; tamaño de fuente: 14px; estilo de letra: cursiva; color: # 949494; relleno: 0 10px 0 10px; float: left; .subscribesubmitbutton background: # ff370f; altura: 40px; frontera: ninguna; ancho: 115px; margen: -1px -60px 0 0; flotador izquierdo; familia de fuentes: 'ProximaNovaRegular', sans-serif; tamaño de fuente: 12px; color: #ffffff; transformación de texto: mayúsculas; relleno: 0 1px 0 0; cursor: puntero;
Note that the only reason we have ProximaNovaRegular is because we are using that font using font-face. You would have to replace it with the font you are using in your theme.
Once you upload the CSS, your final result will look like this:
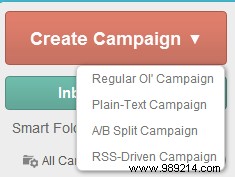
Now that you're done with the styling part, you need to create campaigns in your MailChimp or Aweber dashboard for each specific group. We will use RSS to send email campaigns (RSS Driven Campaigns). Click the Campaigns menu item, then move your mouse over the campaign button. You'll see the RSS-powered campaign option.
The steps after that are pretty intuitive. You will enter your RSS URL, select the time. Then select the segment from your list and that's it.
We hope this article has helped you understand not only how to create daily and weekly newsletters, but also how to segment and group your email lists.