If you are developing a WordPress site for a client, chances are you have shortcodes for your clients to use. The problem is that many beginners don't know how to add shortcodes and if complex parameters are involved then it is even more difficult. Shortcake provides a solution by adding a user interface for shortcodes. In this article, we will show you how to add a shortcode UI in WordPress with Shortcake.
WordPress offers an easier way to add executable code inside posts and pages using shortcodes. Many WordPress themes and plugins allow users to add additional functionality using shortcodes. However, sometimes these shortcodes can get complicated when a user needs to enter parameters for customization.
For example, in a typical WordPress theme, if there is a shortcode to enter a button, the user will likely need to add at least two to five parameters. I like this:
[themebutton url ="http://example.com" title ="Download Now" color ="purple" target ="newwindow”]
Shortcake is a WordPress plugin and a proposed future WordPress feature. Your goal is to solve this problem by providing a user interface for entering these values. This will make the shortcodes much easier to use.
This tutorial is intended for users who are new to WordPress development. Beginner level users who like to modify their WordPress themes will also find this tutorial useful.
With that said, let's get started.
The first thing you need to do is install and activate the Shortcake (Shortcode UI) plugin.
You will now need a shortcode that accepts some input parameters from the user. If you need a bit of an update, here's how to add a shortcode in WordPress.
For the sake of this tutorial, we will use a simple shortcode that allows users to insert a button into their WordPress posts or pages. Here is the sample code for our shortcode, and you can use it by adding it to your theme's functions file or in a site-specific plugin.
add_shortcode ('cta-button', 'cta_button_shortcode'); function cta_button_shortcode ($ atts) extract (shortcode_atts (array ('title' => 'Title', 'url' => ",, $ atts)); devolver ''. $ title. ''; You'll also need to add some CSS to style your button. You can use this CSS in your theme's style sheet.
.cta-button relleno: 10px; tamaño de fuente: 18px; borde: 1px sólido #FFF; radio del borde: 7px; color: #FFF; color de fondo: # 50A7EC;
This is how a user will use the shortcode in their posts and pages:
[cta-button url = "http://example.com"]
Now that we have a shortcode that accepts parameters, let's create a UI for it.
Shortcake API allows you to register the user interface of your shortcode. You will need to describe the attributes that your shortcode accepts, the input field types, and the post types that the shortcode's UI will display.
Here is an example code snippet that we will use to record the UI of our shortcode. We have tried to explain each step with online comments. You can paste this into your theme's functions file or a site-specific plugin.
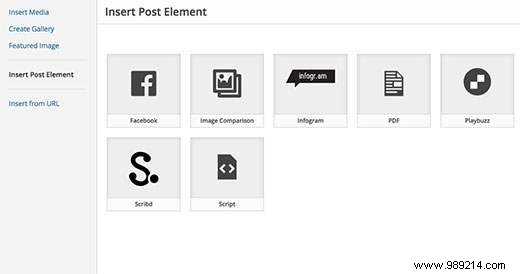
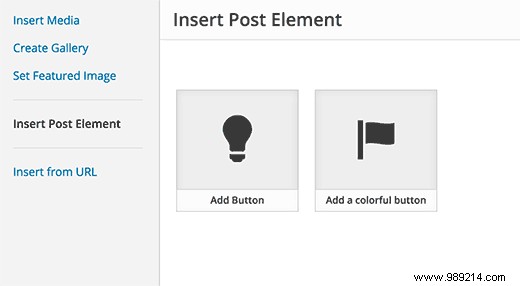
shortcode_ui_register_for_shortcode (/ ** Su identificador de shortcode * / 'cta-button', / ** Su etiqueta de Shortcode y el icono * / array (/ ** Etiqueta para su interfaz de usuario de shortcode. Esta parte es necesaria. * / 'label' => 'Agregar botón', / ** Icono o una imagen adjunta para shortcode. Opcional. Src o dashicons- $ icon. * / 'ListItemImage' => 'dashicons-lightbulb', / ** Atributos de código corto * / 'attrs' => matriz (/ ** * Cada atributo que acepta la entrada del usuario tendrá su propia matriz definida de esta manera * Nuestro código abreviado acepta dos parámetros o atributos, título y URL * Permite definir primero la interfaz de usuario para el campo de título. * / matriz (/ ** Esto la etiqueta aparecerá en la interfaz de usuario * / 'label' => 'Title', / ** Este es el attr real utilizado en el código utilizado para el shortcode * / 'attr' => 'title', / ** Define el tipo de entrada. Los tipos admitidos son texto, casilla de verificación, área de texto, radio, seleccionar, correo electrónico, url, número y fecha. * / 'Type' => 'text', / ** Agregar una descripción útil para los usuarios 'description' => 'Introduzca el texto del botón ',), / ** Ahora vamos a de interfaz de usuario fina para el campo URL * / array ('label' => 'URL', 'attr' => 'url', 'type' => 'text', 'description' => 'Full URL',),) ,), / ** Puede seleccionar qué tipos de publicación mostrarán la IU de código corto * / 'post_type' => array ('post', 'page'),)); That's it, now you can see the shortcode UI in action by editing a post. Simply click the Add Media button above a post editor. This will open the media uploader where you will notice a new "Insert Post Element" item in the left column. Clicking on it will show you a button to insert your code.
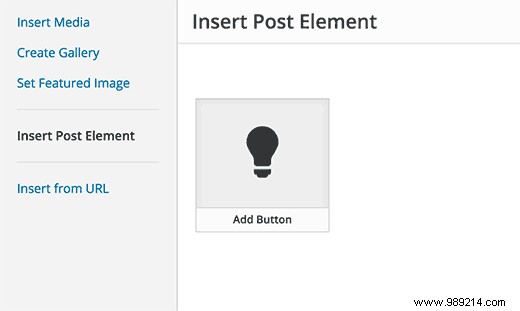
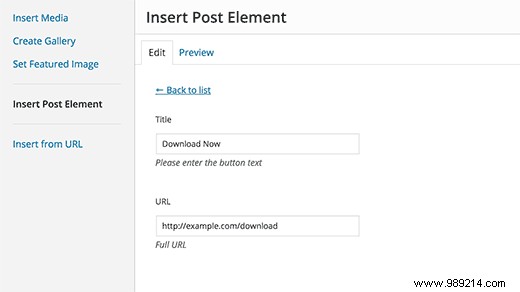
Clicking on the thumbnail containing the light bulb icon and your cake label will show you the shortcode UI.
In the first example, we used a very basic shortcode. Now let's make it a little more complicated and a lot more useful. Let's add a shortcode that allows users to choose a button color.
First we will add the shortcode. It's almost the same shortcode, except now it excepts the user input for color.
add_shortcode ('mybutton', 'my_button_shortcode'); function my_button_shortcode ($ atts) extract (shortcode_atts (array ('color' => 'blue', 'title' => 'Title', 'url' => ", $ atts)); return ''. $ title . ''; Since our shortcode will display buttons in different colors, we'll need to update our CSS as well. You can use this CSS in your theme's style sheet.
.mybutton relleno: 10px; tamaño de fuente: 18px; borde: 1px sólido #FFF; radio del borde: 7px; color: #FFF; .blue-button background-color: # 50A7EC; .orange-button background-color: # FF7B00; .green-button background-color: # 29B577;
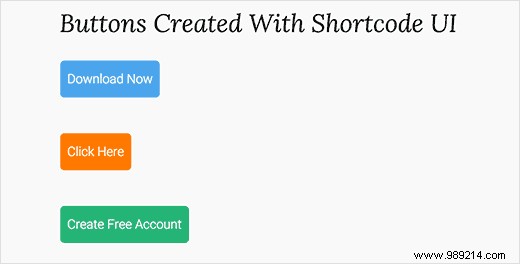
This is what the buttons will look like:
Now that our shortcode is ready, the next step is to register the shortcode UI. We'll be using essentially the same code, except this time we have another parameter for color and we're offering users to select between blue, orange, or green buttons.
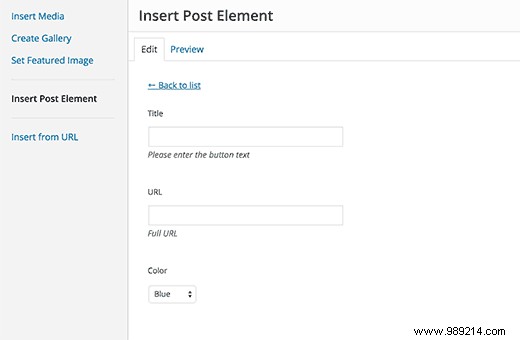
shortcode_ui_register_for_shortcode (/ ** Su identificador de shortcode * / 'mybutton', / ** Su etiqueta e icono de Shortcode * / array (/ ** Etiqueta para su interfaz de usuario de shortcode. Esta parte es necesaria. * / 'label' => 'Agregar un botón colorido ', / ** Icono o un archivo adjunto de imagen para shortcode. Opcional. src o dashicons- $ icon. * /' listItemImage '=>' dashicons-flag ', / ** Atributos de código corto * /' attrs '=> matriz (/ ** * Cada atributo que acepta la entrada del usuario tendrá su propia matriz definida de esta manera * Nuestro código abreviado acepta dos parámetros o atributos, título y URL * Permite definir primero la interfaz de usuario para el campo de título. * / matriz (/ ** Esto la etiqueta aparecerá en la interfaz de usuario * / 'label' => 'Title', / ** Este es el attr real utilizado en el código utilizado para el shortcode * / 'attr' => 'title', / ** Define el tipo de entrada. Los tipos admitidos son texto, casilla de verificación, área de texto, radio, seleccionar, correo electrónico, url, número y fecha. * / 'Type' => 'text', / ** Agregar una descripción útil para los usuarios * / 'description' => ' Por favor ingrese el texto del botón ',), / ** Ahora nosotros definirá la interfaz de usuario para el campo de URL * / array ('label' => 'URL', 'attr' => 'url', 'type' => 'text', 'description' => 'Full URL',), / ** Finalmente, definiremos la IU para la selección de color * / array ('label' => 'Color', 'attr' => 'color', / ** Usaremos el campo de selección en lugar del texto * / 'type' => 'select', 'options' => array ('blue' => 'Blue', 'orange' => 'Orange', 'green' => 'Green',),),), / ** You puede seleccionar qué tipos de publicación mostrarán la IU de código corto * / 'post_type' => array ('post', 'page'),)); That's it, now you can edit a post or page and click the add media button. You will notice your newly added shortcode under 'Insert Post Elements'.
Clicking on the shortcode you just created will bring up the shortcode UI, where you can simply enter the values.
You can download the code used in this tutorial as a plugin.
wpb-shortcake-tutorial
We've included the CSS, so you can use it to study it or use it to add your own call to action buttons in WordPress using a simpler user interface. Feel free to modify the font and play around with it.
We hope this article helped you learn how to add a shortcode UI in WordPress with Shortcake. You may also want to take a look at these 7 essential tips for using shortcodes in WordPress.
If you enjoyed this article, please subscribe to our WordPress YouTube Channel video tutorials. You can also find us on Twitter and Facebook.