BlueStacks is one of the popular Android emulators which allows users to install and run Android apps on their computers. The application is completely free and available for Windows and Mac. You can download it from its official website. After installing BlueStacks, you can access Google Play Store directly from your Windows device and install all Android apps and games on your Windows PC. Sometimes BlueStacks gets stuck on splash engine screen . If you have such a problem with BlueStacks on your computer, the solutions listed in this article may help you fix it.
SummaryBlueStacks is stuck on splash engine screen1]Enable virtualization2]Allocate more CPU cores and RAM to BlueStacks3]Temporarily disable your antivirus4]Update your graphics card driverHow to fix BlueStacks stuck on startup?Why BlueStacks does it not work on Windows 11/10?
To run particular software on your Windows computer, it must meet all the hardware requirements. You will also encounter this problem if your system is not compatible with BlueStacks. Therefore, before installing BlueStacks on your system, it will be better to check the BlueStacks hardware requirements from the official website.
If BlueStacks gets stuck on the engine splash screen and won't go any further, you can try the solutions explained in this article to fix the problem. Before proceeding, we suggest you try the following quick fixes and see if they help:
If after trying the quick fixes above, you still face the same problem, you can move on to the troubleshooting methods described below.
Let's see all these solutions in detail.
To use BlueStacks, your Windows computer must support virtualization technology. If your computer supports virtualization, you must enable it. Computers of different brands have different methods of enabling virtualization. After enabling virtualization, launch BlueStacks and check if it gets stuck on splash engine screen this time or not.
If your system supports virtualization and despite enabling virtualization, you still face the same issue with BlueStacks, allocating more CPU cores and RAM to BlueStacks may fix the issue.
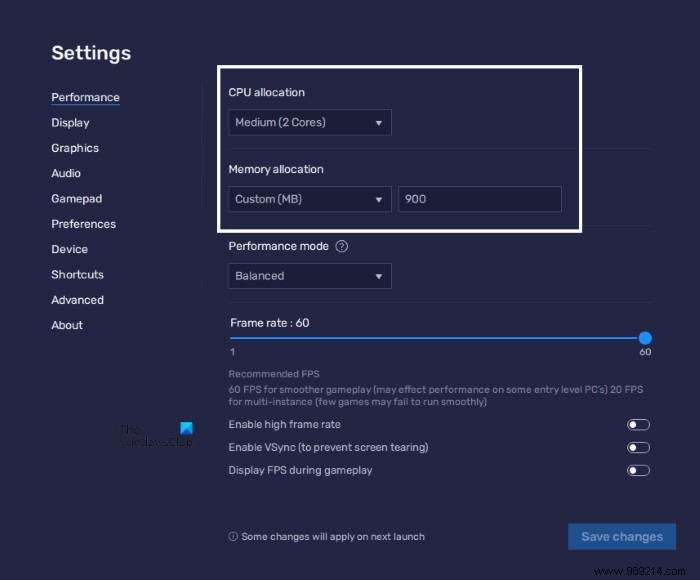
The following steps will guide you on how to allocate more CPU cores and memory to BlueStacks:
Allocating the highest CPU cores and memory to BlueStacks will increase the performance of applications and games running in BlueStacks. But it will also increase the strain on your CPU and RAM. This can affect the performance of laptops with low specs, such as 4 CPU cores and 4 GB of RAM. In this case, if you run another app alongside BlueStacks, your system may crash or freeze. On the other hand, increasing the number of CPU cores and RAM for BlueStacks will not affect laptops with a good configuration, say laptops with 8 or more CPU cores and 8 GB or more of RAM.
Do not allocate all CPU cores and all memory to BlueStacks. When increasing CPU cores and RAM for a particular application, always select a value that is lower than the total number of CPU cores and RAM your system has.
Your antivirus may interrupt the working of BlueStacks. To check this, first temporarily disable your antivirus software and then launch BlueStacks. If BlueStacks does not get stuck on Start Engine screen, your antivirus is preventing BlueStacks from working properly. In this case, you can disable your antivirus while using BlueStacks and re-enable it after exiting BlueStacks.
You may also experience this issue with BlueStacks if your graphics card driver is outdated or corrupted. In such a case, updating the graphics card driver solves the problem.
When it comes to updating the graphics card driver, Windows 11/10 users have the following options:
This should fix the problem.
The BlueStacks crashing issue on startup or initialization screen can occur due to a minor bug in the software. In this case, uninstalling and reinstalling the latest version of BlueStacks may fix the problem. Apart from that, you can also try running BlueStacks in compatibility mode and check its administrative privileges.
If BlueStacks is not working on your Windows 11/10 system, you should first check whether or not your computer meets the minimum hardware requirements for BlueStacks. If despite compatible hardware, BlueStacks is not working on your system, you can try a few other things like enabling virtualization, updating your graphics card driver, etc. If nothing helps, uninstall and reinstall BlueStacks after downloading the latest version from its official website.
If BlueStacks won't start when Hyper-V is enabled, you need to check and configure Hyper-V settings.
Hope this helps.