At the start of the COVID-19 pandemic, people who wanted to get together while staying safe from infection found they could meet friends, family and colleagues via videoconferencing software. Perhaps because many of them were already using Zoom at work for video conferencing, this app almost immediately became the flavor of the day.
There were a few hiccups along the way, perhaps because Zoom was meant to be primarily a business app. At first, while Zoom included some methods that could be used to protect meetings, these features could be hard to find, especially if you hadn't used the app before. Meetings began to be interrupted by unwanted intruders who deliberately caused disruption, often in extremely unpleasant ways (a problem that soon became known as "Zoombombing").
Unsurprisingly, this has resulted in considerable backlash, largely regarding the lack of security for users. In response, the company implemented additional security measures. For example, it automatically enabled virtual waiting rooms and passwords for accounts in its free and lowest-paying tiers, and encouraged people to use unique meeting IDs rather than their personally assigned IDs. permanent.
Having to manage passwords and virtual waiting rooms can make the interface a bit less user-friendly, but it also means it's less likely that someone you don't know not appear in your family reunion.
While there are a number of alternative video conferencing services available, Zoom remains a popular choice. So if you're using the free version of Zoom, here are some ways to secure your meetings.
Zoom automatically adds passwords to accounts, and these passwords can be embedded in meeting links. For example, if you're scheduling a meeting, you'll see that the link contains your meeting ID and, right after that, the meeting password. Anyone you send this link to will be able to immediately access your meeting without having to separately post a password – and if they decide to post this link publicly, it will negate any security the password might have provided.
So while everyone who uses Zoom has a personal meeting ID, using that ID for all of your meetings means that more and more people will know that ID, increasing chances that an undesirable person can end up.
For this reason, when you schedule a meeting, Zoom now assumes that you want to use an auto-generated unique meeting ID rather than your personal meeting ID. In fact, there's little reason to use that personal ID – even if you have a regularly scheduled conference with friends, you can just send a new invite (with a new meeting ID) for each meeting, just to be sure.
If you haven't created a meeting yet, here's the process you'll probably follow:
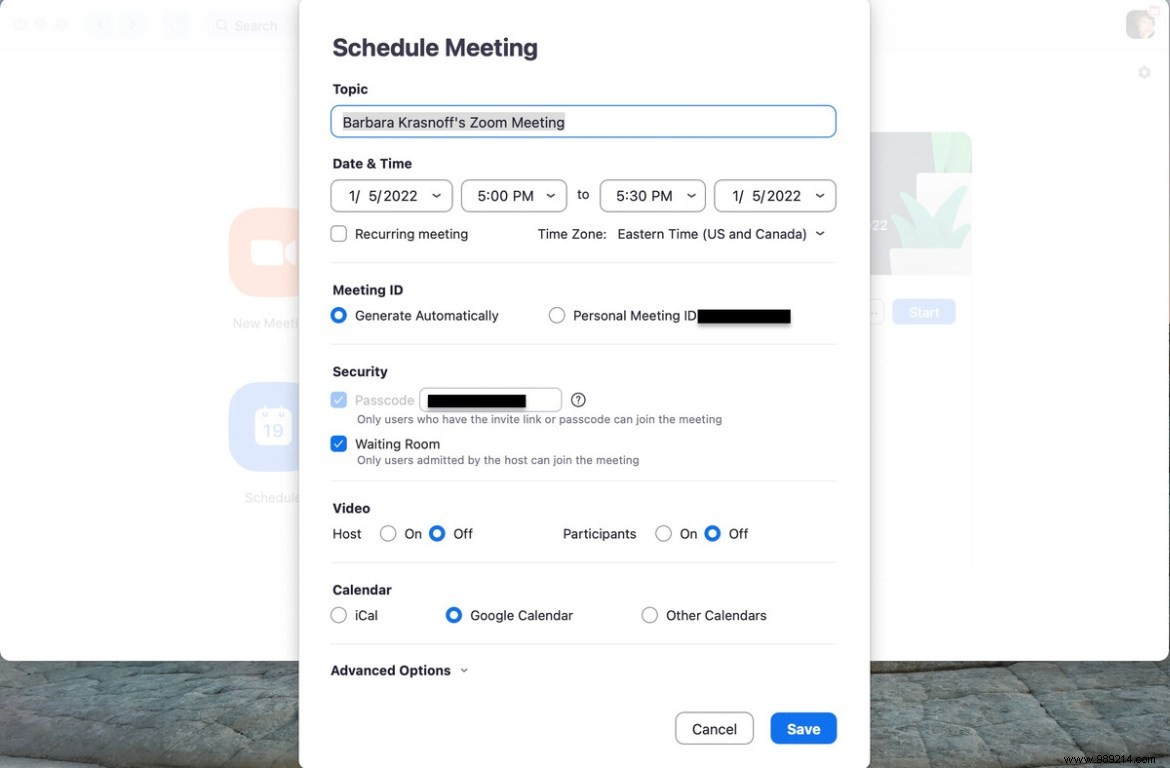
As mentioned earlier, you can approve anyone who wants to join a meeting using a virtual waiting room, from which you can then let them in or not.
When each participant clicks on their link, they will be asked to wait, while you will receive a notification at the top of your screen telling you that someone has entered the waiting room. You can either admit them immediately or click "View".
A sidebar will then show you everyone waiting to enter the meeting; you can then either admit them, remove them from the waiting room (and any possibility of entering the meeting), or send them a message.
Having to approve everyone who wants to join can be a pain to manage, especially if you're expecting a lot of people, but it will ensure that anyone who shows up to your meeting actually belongs there.
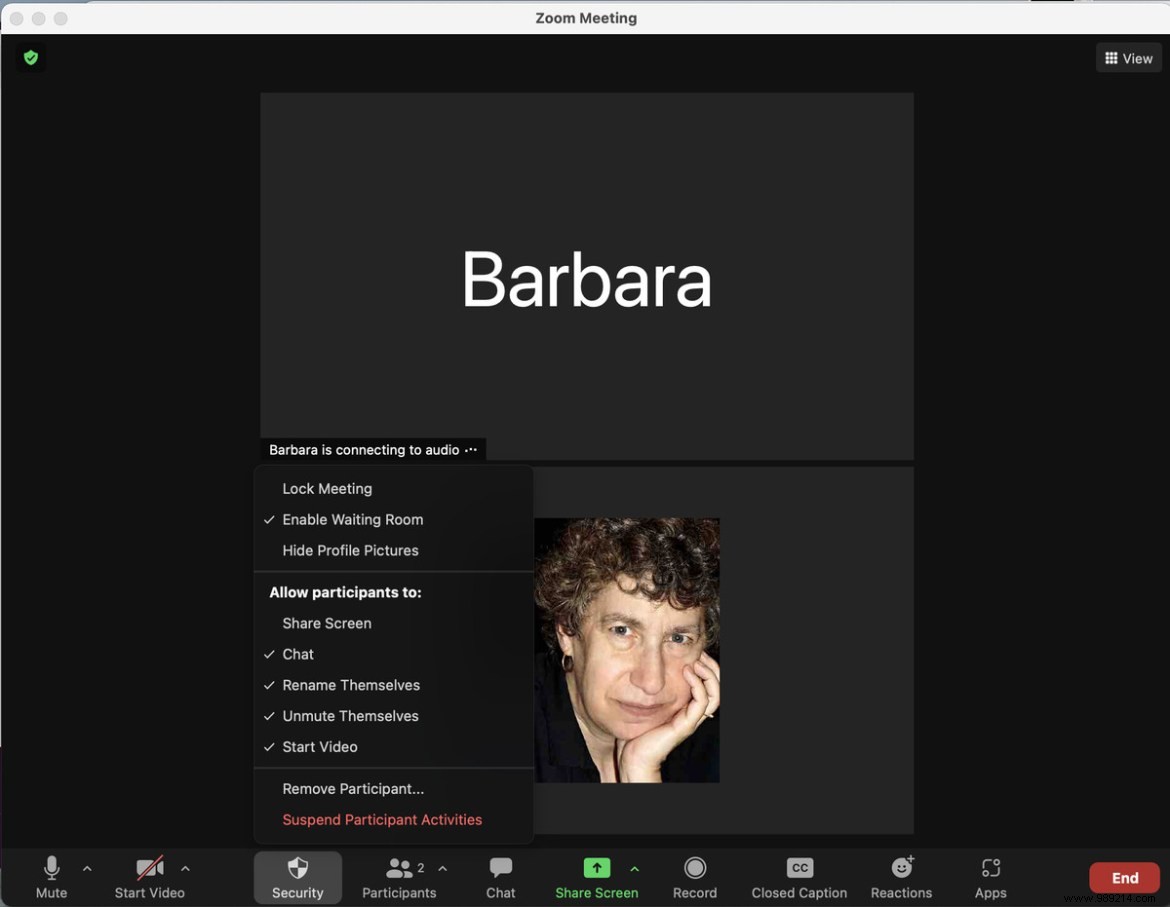
There are other Zoom security features you can use to protect yourself and other participants.
If you know exactly who belongs to your meeting and they are all there, you can lock the meeting by clicking on the "Security" link at the bottom of the screen and choosing "Lock the meeting". meeting ". Once you do that, even someone who has the meeting ID and password cannot enter.
Using the same menu, it might also be a good idea, especially if you're having a meeting with a lot of people, to uncheck the "Share Screen" selection. If, by chance, someone who wants to disrupt the meeting is allowed to share their screen, it can make things extremely uncomfortable for the rest of the participants. (If at any time a participant has a legitimate need to share their screen, you can re-enable sharing at any time.)
If a participant starts misbehaving but you don't necessarily want to kick them out (or want to discuss what you're getting them for their birthday), you can put them back in the waiting room. Click on the "Attendees" icon at the bottom of your screen, find the attendee's name on the resulting side panel, hover over their name, then click "More"> "Put to Waiting Room". The participant will no longer have access to the meeting; indeed, they will be back in the waiting room until you decide to let them back.
Of course, you can completely kick someone out of the meeting by using this same drop-down menu and clicking "Remove". If it becomes necessary, by the way, it might be a good idea to lock the meeting so they can't try to come back.
If things get really out of control, click the Security icon and select "Suspend Attendee Activities". According to Zoom, this will stop "all video, audio, in-meeting chat, annotation, screen sharing and recording during this time" and as a host you will be asked if you want to report a particular user. You will also be able to provide details of the issue, along with screenshots. This person will be removed from the meeting (and reported to Zoom's Trust and Safety team), and you can then re-enable your various features and continue your meeting.
Updated January 13, 2022, 9am ET: This article was originally published on April 17, 2020 and has been updated to reflect changes to Zoom.