If you want to transmit large amounts of data to the cloud, you can improve performance and response times by using your Raspberry Pi as an edge gateway. EdgeX Foundry is a platform you can use to build custom Internet of Things (IoT) solutions, by consuming and processing data from the various smart devices and sensors in your home automation network.
ContentsWhat You'll NeedFlash Ubuntu to Your Raspberry PiBoot Your Raspberry Pi in UbuntuInstalling the EdgeX FoundryAdding a Raspberry Pi as an Edge GatewayConclusionIn this article, you'll learn how to save your data more efficiently by turning your Raspberry Pi 4 into a connection point between the cloud and all the sensors, smart devices, and controllers on your network.
Logging your data in the cloud can help you identify trends:for example, use your smart scale to log your daily weigh-ins or your smart exercise bike to log the number of miles you've cycled. When transmitting large amounts of data to the cloud, you can often reduce response times and network transmission costs by pre-processing that data locally.
To complete this tutorial you will need:
To turn your Raspberry Pi into an Edge Gateway, you will need Ubuntu 19.10. Later versions of Ubuntu will likely support EdgeX Foundry as well, but the process for setting up your Raspberry Pi as an Edge Gateway may differ.
In this tutorial, we will flash the Ubuntu system image using the free balena Burner application.
To provision the Raspberry Pi as an Edge Gateway:
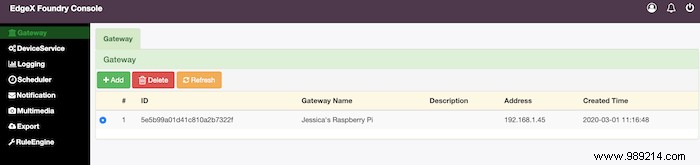
The Raspberry Pi should now appear in the console, ready to use.
In this article, you learned how to configure a Raspberry Pi 4 as an Edge Gateway.
If you've followed this tutorial, we'd love to hear how you're using Raspberry Pi as a connection point between the cloud and your smart home network, so be sure to share your gateway projects in the comments below!