Today, it's tempting to assume that every device supports Wi-Fi, but not all devices are capable of connecting to the internet wirelessly. This is where a Raspberry Pi can come in handy:by turning it into a Wi-Fi bridge.
If you want to reuse an old Ethernet-only desktop computer and need a quick and easy way to convert a Wi-Fi signal to an Ethernet connection, you can use a Raspberry Pi.
In this tutorial, you'll learn how to turn your Raspberry Pi into a Wi-Fi bridge that connects to your wireless network and converts that signal to a wired connection. You can then connect any device to the Raspberry Pi via an Ethernet cable, and that device will instantly have access to your network.
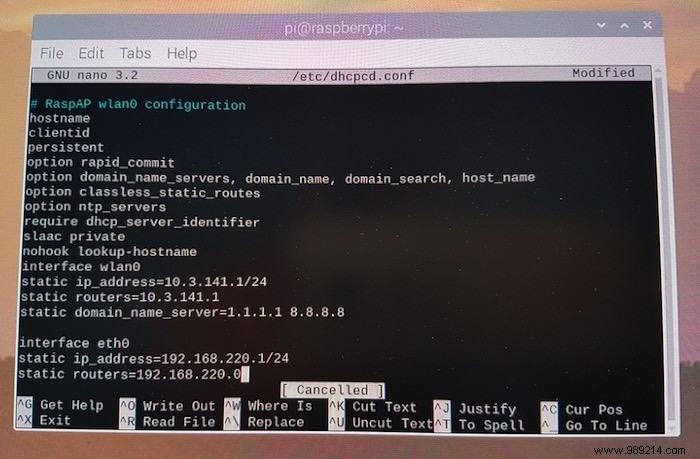
Save your changes by pressing Ctrl + O . To close the configuration file, press Ctrl + X .
Next, enable IP forwarding so your Raspberry Pi can accept network packets from the Ethernet connection and forward them to your router.
To enable ipv4p IP forwarding, edit the "sysctl.conf" configuration file:
sudo nano /etc/sysctl.conf
The “sysctl.conf” file will now launch in the Nano text editor. In this file, find the following line:
Remove the # so this line becomes:
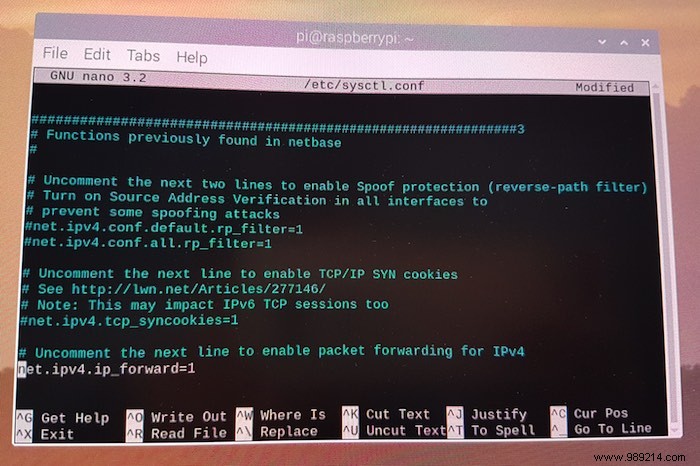
Save your changes by pressing Ctrl + O . To close the configuration file, press Ctrl + X .
Now activate your new "sysctl.conf" configuration file:
sudo sh -c "echo 1> /proc/sys/net/ipv4/ip_forward"
Now that you have successfully enabled IP forwarding, you can configure your firewall to forward traffic from the Ethernet interface (eth0) to the Wi-Fi connection. With this forwarding in place, any device that connects to the Raspberry Pi over Ethernet will access the Pi's Wi-Fi connection (wlan0).
Add some rules that indicate how your Raspberry Pi should forward any data packets it receives:
sudo iptables -t nat -A POSTROUTING -o wlan0 -j MASQUERADEsudo iptables -A FORWARD -i wlan0 -o eth0 -m state --state RELATED,ESTABLISHED -j ACCEPTsudo iptables -A FORWARD -i eth0 -o wlan0 -j ACCEPT
Save these new rules:
sudo sh -c "iptables-save> /etc/iptables.ipv4.nat"
These rules will be deleted every time your Raspberry Pi restarts, so make sure they are reloaded on startup.
Define what happens on startup by editing the 'rc.local' file:
sudo nano /etc/rc.local
The rc.local file will now open in the Nano text editor. In the editor, find the following:
exit
Add the following directly above the "exit" line:
iptables-restoreSave your changes by pressing Ctrl + O . To close the configuration file, press Ctrl + X .ter.
Test your Wi-Fi bridge
The last step is to start the dnsmasq service:
sudo service dnsmasq startYou can now test your Wi-Fi bridge! Connect any Ethernet-only device to your Raspberry Pi via an Ethernet cable. Your Raspberry Pi will now provide an internet connection to this Ethernet-only device.
Conclusion
You have learned how to share your Raspberry Pi's Wi-Fi with any wired device by converting its Wi-Fi connection to an Ethernet connection. You can also use your Raspberry Pi as a captive portal Wi-Fi hotspot or as a personal web server. Let us know if this is useful to you.
Read on for other Raspberry Pi projects you can do yourself.
ContentsTurn your Raspberry Pi into a Wi-Fi bridgeWhat you'll needUpdate your PiConfigure your network services:installing dnsmasqConfigure your ethernet connectionReplacing the dnsmasq configuration fileEnable IP forwardingStart forwarding traffic from Ethernet to Wi-FiTest your Wi-Fi bridge -FiConclusion