Raspberry Pi supports several Linux distributions. Most of the time, you just need to flash the system image to an SD card, insert that SD card into your Raspberry Pi, and start running it. However, this does not apply to Ubuntu. Installing Ubuntu on Raspberry Pi used to be a hassle, with the need to first create an Ubuntu SSO account before downloading the Ubuntu Core image.
Fortunately, with the release of the Raspberry Pi Imager tool, installing Ubuntu on Raspberry Pi is now very simple. You will learn in this article how to flash an Ubuntu image on your Raspberry Pi.
In March 2020, the official Raspberry Pi Foundation released the Raspberry Pi Imager tool. This is a simple tool that downloads a list of the different operating systems you can use with your Raspberry Pi.
Simply select an image from the list and the Raspberry Pi Imager will read the relevant files from the Foundation's website and write them directly to your SD card, without you having to worry about finding the correct system image and download to your hard drive.
Let's see how you can use this tool to install Ubuntu on your Raspberry Pi.
If you haven't already, go to the Raspberry Pi Foundation website and download the correct version of Raspberry Pi Imager for your operating system.
Once the Raspberry Pi imager is installed:
1. Insert your SD card into your laptop or computer.
2. Launch the Raspberry Pi Imager app.
3. Click "Choose Operating System". The imager will now retrieve and display information about the various operating systems compatible with Raspberry Pi.
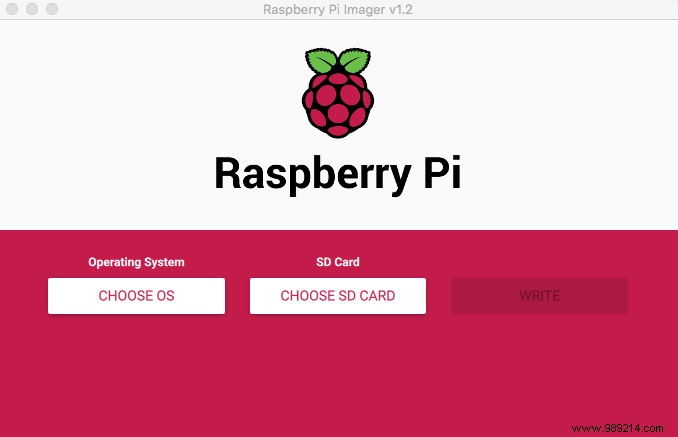
6. Now all you have to do is click "Write" and wait for the Raspberry Pi Imager to write the system image to your SD card.
Next, modify the Ubuntu system image on the SD card so that the Pi automatically connects to the Wi-Fi network:
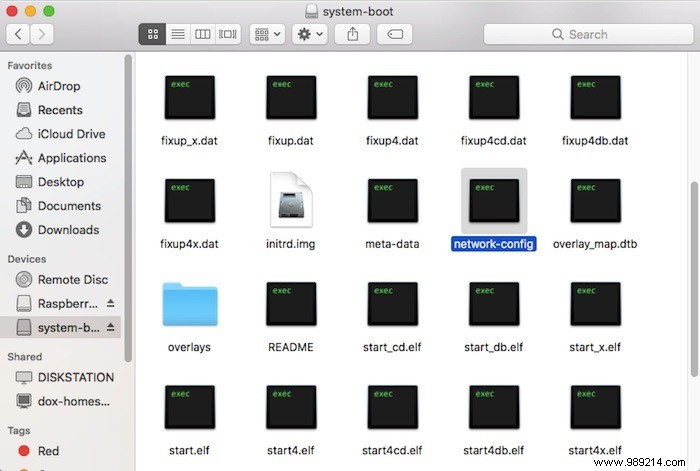
1. Make sure your SD card is inserted in your laptop or computer. Launch a file manager app and navigate to the SD card folder.
2. Open the "system-boot" partition, as it contains the configuration files that will be loaded when the Raspberry Pi boots.
3. Open the “network-config” file in a text editor.
4. Find the "wifis" section and uncomment everything inside that section by removing the "#" at the beginning of each line.
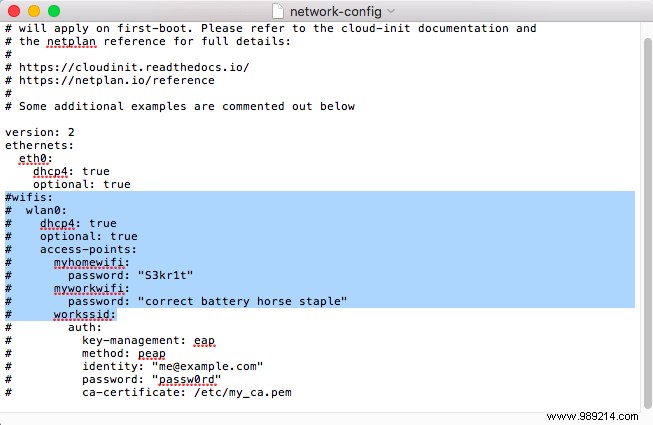
The Wi-Fi section should now look like the image below.
wifis:wlan0:dhcp4:true optional:true access-points:myhomewifi:password:"S3kr1t"
You will need to update "access points" to reference the name of your Wi-Fi network. If this name contains spaces, be sure to enclose it in quotation marks, for example:
access-points:"My home network":
Next, replace "S3kr1t" with your own Wi-Fi network password.
Save this file and safely eject the SD card from your laptop or computer.
Now every time you start your Raspberry Pi, it automatically connects to the network.
Connect your monitor and keyboard to the Raspberry Pi and turn it on. On the login screen, log in to Ubuntu's default account:"ubuntu" for username and password.
Since this default login is common knowledge, you will be prompted to change the password to something more secure. To create a new password, follow the on-screen instructions.
By now you will have noticed that Ubuntu does not come with a Graphical User Interface (GUI), so you can only interact with your Raspberry Pi from the command line.
If you prefer interacting with your Pi in a desktop environment, you can install many desktops:
First, update your Raspberry Pi:
sudo apt update &&sudo apt -y upgrade
You can then install your preferred desktop environment. For example:
sudo apt install kubuntu-desktopsudo apt install lubuntu-desktopsudo apt install xubuntu-desktop
Once you have installed your desktop environment, reboot your Pi with the following command:
When your Raspberry Pi boots up, the desktop environment will be ready to use.
If you prefer to run your Pi headless, you might want to communicate with it via SSH.
To communicate via SSH, you will need to know your Raspberry Pi's IP address. If you don't know your Pi's IP address, there are several ways to retrieve this information for a headless Raspberry Pi:
Every router is different, but if you explore the different menus and sections, you should be able to find a record of all the devices connected to your router. Find your Raspberry Pi in the list, click on it, and you should have access to the Pi's IP address.
Fing is a free network analyzer app available for Android and iOS.
Install this app on your smartphone, then select "Find Devices -> Devices". You should now have a list of devices that are currently connected to your network.
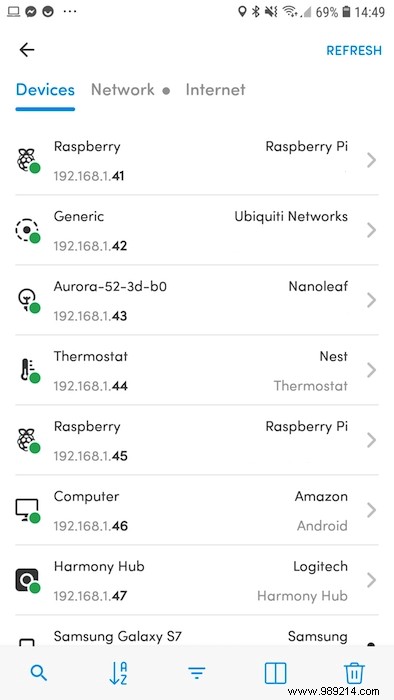
Find your Raspberry Pi and write down its IP address.
Once you have your Raspberry Pi's IP address, you are ready to connect via SSH.
On your computer, open a Terminal and run the following command:
ssh ubuntu@
When prompted, enter Ubuntu's default password:"ubuntu".
You are now connected to your Raspberry Pi and can start issuing commands via SSH.
As you can see, it's easy to install Ubuntu on your Raspberry Pi using the new Imager app. If you're not interested in Ubuntu, you can also install FydeOS on Raspberry Pi or simply turn your Raspberry Pi into a Wi-Fi bridge.